Steps to create user roles in AIV application
There are two ways in which a user can create a user in the AIV application:-
-
By clicking on the create icon
 located at the bottom most toolbar.
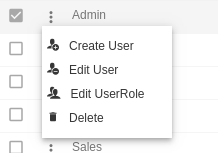
- By right clicking any existing user and select Create User as follows:-
Now perform the following steps in order to create a new user role:-
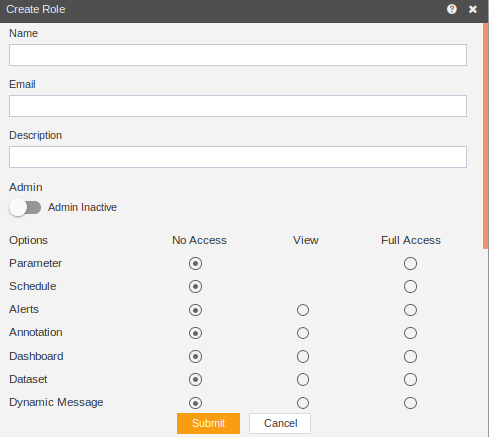
- Click on Create using one of the methods mentioned above which will open the following popup.
- Enter the details as shown in the figure above:-
- Let us understand what is the purpose of each field:-
- Name:- Enter the name you want to give to the role.(required field)
- Email Address:- Enter the email address of the user role(required field).
- Description:- Enter any text describing the role of user(optional field).
- Admin Active:- This is a toggle value which gives admin rights to user.If enabled the user does not need to provide rights to any section individually.
- Landing Page:- The first page that will be opened on login.
- When Role is not part of Admin Role, Administrator can assign different privilege to the Role depending on the Role they are creating, this can be done using the various options, there are three Options available for each sections i.e. No Access (Users with this Role will have no access to the selected sections) View (Users with this Role will have only view privileges, that means they cannot edit or create new files in the selected sections) Full Access (Users with this Role will have all the rights such as create, edit, upload and delete the files for the sections with Full Access).
- In case of any further help, the user can click on the
 icon to access the AIV help documents.
 - Finally, click on
 button to create a new user role.
 - If the user is not satisfied and wants to cancel the create request, he can do this by clicking on the cancel button next to submit or by clicking on
 button next to the icon.
In this manner, you can create a new user role in the AIV application.